
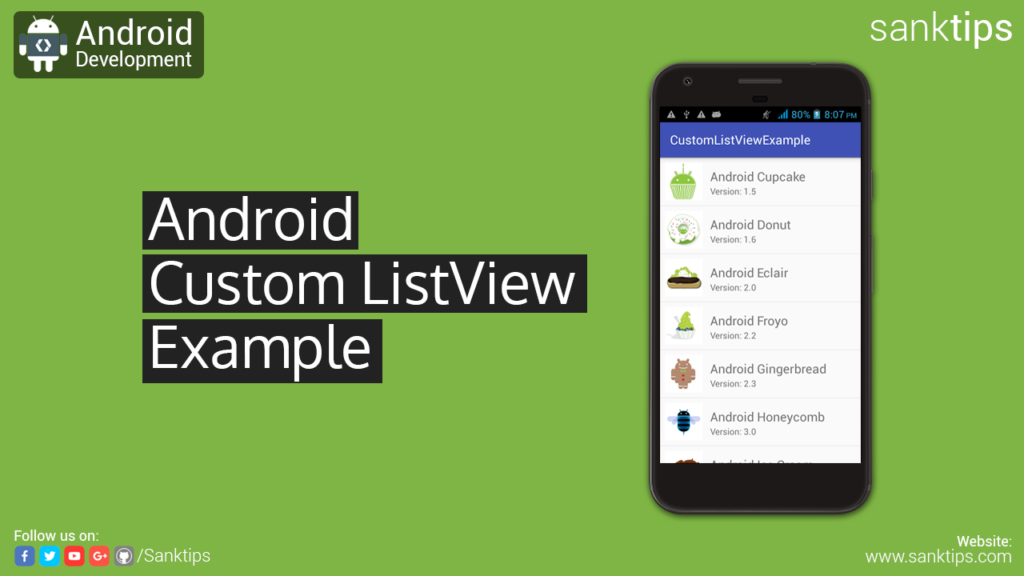
In this article will see how to create custom ListView in android. By creating a custom ListView you can design how a single row will look like in the view. ListView is the basic component to view the data in a list.
Steps and Source Code for Creating Custom ListView with image and text –
– First Create a new Project CustomListViewExample.
– Create an empty activity i.e MainActivity
– Add all images to res > drawable folder that are to be displayed in our ListView.
– Now add ListView to your Activity layout file
activity_main.xml file:
<?xml version="1.0" encoding="utf-8"?>
<RelativeLayout xmlns:android="http://schemas.android.com/apk/res/android"
xmlns:app="http://schemas.android.com/apk/res-auto"
xmlns:tools="http://schemas.android.com/tools"
android:layout_width="match_parent"
android:layout_height="match_parent"
tools:context="com.sanktips.customlistviewexample.MainActivity">

<ListView
android:id="@+id/androidList"
android:layout_width="match_parent"
android:layout_height="match_parent"/>

</RelativeLayout>
– Next step is to create a custom layout file to format how a single row will look in our ListView.
– Right click on the layout folder, New and then click on Layout resource file and name it to single_list_item.xml
single_list_item.xml file:
<?xml version="1.0" encoding="utf-8"?>
<RelativeLayout xmlns:android="http://schemas.android.com/apk/res/android"
android:layout_width="match_parent"
android:layout_height="match_parent"
android:padding="8dp">

<ImageView
android:id="@+id/appIconIV"
android:src="@drawable/alpha"
android:layout_width="60dp"
android:layout_height="60dp" />

<TextView
android:id="@+id/aNametxt"
android:text="Android Name"
android:textSize="20sp"
android:layout_marginTop="8dp"
android:maxLines="1"
android:layout_width="match_parent"
android:layout_height="wrap_content"
android:layout_alignParentTop="true"
android:layout_toRightOf="@+id/appIconIV"
android:layout_toEndOf="@+id/appIconIV"
android:layout_marginLeft="12dp"
android:layout_marginStart="12dp" />

<TextView
android:id="@+id/aVersiontxt"
android:text="Android Version"
android:textSize="14sp"
android:maxLines="1"
android:layout_width="match_parent"
android:layout_height="wrap_content"
android:layout_below="@+id/aNametxt"
android:layout_alignLeft="@+id/aNametxt"
android:layout_alignStart="@+id/aNametxt" />


</RelativeLayout>
– Now we need an adapter to populate the ListView.
– Right click on package folder i.e in my case com.sanktips.customlistviewexample, New and then click on java class.
– Name the class as ListAdapter and extend it with BaseAdapter.
– Now create a constructor for the class and all overriding methods as given below.
ListAdapter.java file:
package com.sanktips.customlistviewexample;

import android.content.Context;
import android.support.annotation.NonNull;
import android.support.annotation.Nullable;
import android.view.LayoutInflater;
import android.view.View;
import android.view.ViewGroup;
import android.widget.ArrayAdapter;
import android.widget.BaseAdapter;
import android.widget.ImageView;
import android.widget.TextView;

import java.util.ArrayList;


public class ListAdapter extends BaseAdapter {

    Context context;
    private final String [] values;
    private final String [] numbers;
    private final int [] images;

    public ListAdapter(Context context, String [] values, String [] numbers, int [] images){
        //super(context, R.layout.single_list_app_item, utilsArrayList);
        this.context = context;
        this.values = values;
        this.numbers = numbers;
        this.images = images;
    }

    @Override
    public int getCount() {
        return values.length;
    }

    @Override
    public Object getItem(int i) {
        return i;
    }

    @Override
    public long getItemId(int i) {
        return i;
    }

    @NonNull
    @Override
    public View getView(int position, @Nullable View convertView, @NonNull ViewGroup parent) {


        ViewHolder viewHolder;

        final View result;

        if (convertView == null) {

            viewHolder = new ViewHolder();
            LayoutInflater inflater = LayoutInflater.from(context);
            convertView = inflater.inflate(R.layout.single_list_item, parent, false);
            viewHolder.txtName = (TextView) convertView.findViewById(R.id.aNametxt);
            viewHolder.txtVersion = (TextView) convertView.findViewById(R.id.aVersiontxt);
            viewHolder.icon = (ImageView) convertView.findViewById(R.id.appIconIV);

            result=convertView;

            convertView.setTag(viewHolder);
        } else {
            viewHolder = (ViewHolder) convertView.getTag();
            result=convertView;
        }

        viewHolder.txtName.setText(values[position]);
        viewHolder.txtVersion.setText("Version: "+numbers[position]);
        viewHolder.icon.setImageResource(images[position]);

        return convertView;
    }

    private static class ViewHolder {

        TextView txtName;
        TextView txtVersion;
        ImageView icon;

    }

}
– Final step is to create array for Images and Text to be populated into ListView. Also connect the ListView component in layout file and setup the adapter in our MainActivity.
MainActivity.java file:
package com.sanktips.customlistviewexample;

import android.support.v7.app.AppCompatActivity;
import android.os.Bundle;
import android.view.View;
import android.widget.AdapterView;
import android.widget.ListView;
import android.widget.Toast;

public class MainActivity extends AppCompatActivity {

    int[] images = {R.drawable.alpha, R.drawable.beta, R.drawable.cupcake, R.drawable.donut, R.drawable.eclair, R.drawable.froyo, R.drawable.gingerbread, R.drawable.honeycomb, R.drawable.icecreamsandwich, R.drawable.jellybean, R.drawable.kitkat, R.drawable.lollipop, R.drawable.marshmallow, R.drawable.nougat};

    String[] version = {"Android Alpha", "Android Beta", "Android Cupcake", "Android Donut", "Android Eclair", "Android Froyo", "Android Gingerbread", "Android Honeycomb", "Android Ice Cream Sandwich", "Android JellyBean", "Android Kitkat", "Android Lollipop", "Android Marshmallow", "Android Nougat"};

    String[] versionNumber = {"1.0", "1.1", "1.5", "1.6", "2.0", "2.2", "2.3", "3.0", "4.0", "4.1", "4.4", "5.0", "6.0", "7.0"};

    ListView lView;

    ListAdapter lAdapter;

    @Override
    protected void onCreate(Bundle savedInstanceState) {
        super.onCreate(savedInstanceState);
        setContentView(R.layout.activity_main);

        lView = (ListView) findViewById(R.id.androidList);

        lAdapter = new ListAdapter(MainActivity.this, version, versionNumber, images);

        lView.setAdapter(lAdapter);

        lView.setOnItemClickListener(new AdapterView.OnItemClickListener() {
            @Override
            public void onItemClick(AdapterView<?> adapterView, View view, int i, long l) {

                Toast.makeText(MainActivity.this, version[i]+" "+versionNumber[i], Toast.LENGTH_SHORT).show();

            }
        });

    }
}
– Run the code to see the results.
Hope you find this article helpful. Join us on Facebook, Twitter and Google+ to get more updates on Android Development Tutorials.