
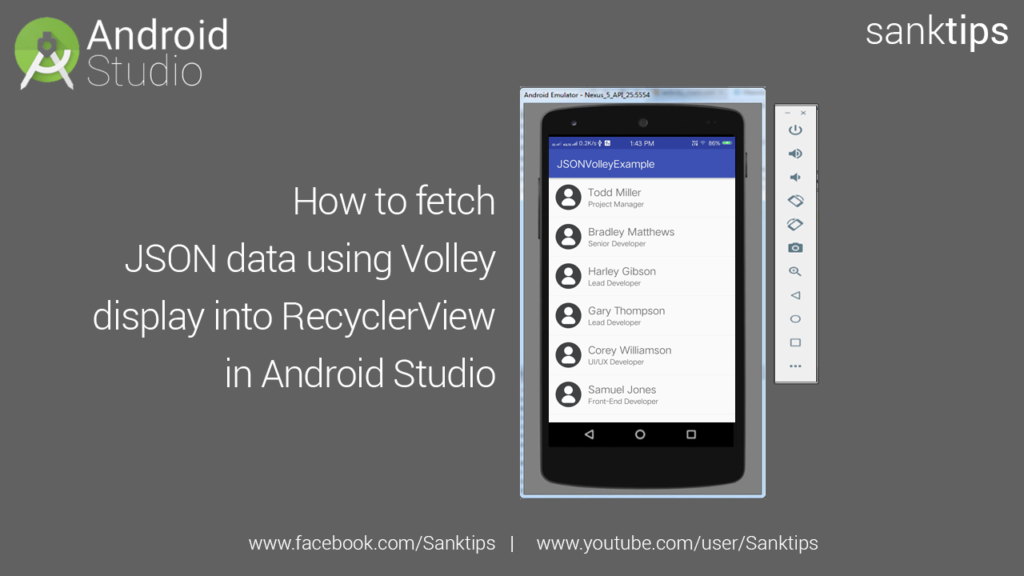
In this article, will see how to fetch JSON data using Volley and display it to RecyclerView into our Android Project. Volley is an HTTP library that makes networking request response for Android apps easier and faster.
The motive of our Application is to fetch data from the server. For this, we have made a PHP file to output the data from our server into JSON format. Then with the help of Volley Library we will fetch the data from PHP file and display it into our app. So lets get started with fetching data from server.
Steps and Source code for fetch JSON data using Volley and display it to RecyclerView –
– First you need to create an API to output data from server that is to be fetched in our app.
– This is the output of our API. Request URL: http://localhost/testapi.php
(To see how to create simple Restful API with PHP and MySql – Click Here)
Json output:
[
    {
        "id": "1",
        "firstname": "Todd",
        "lastname": "Miller",
        "jobprofile": "Project Manager"
    },
    {
        "id": "2",
        "firstname": "Bradley",
        "lastname": "Matthews",
        "jobprofile": "Senior Developer"
    },
    {
        "id": "3",
        "firstname": "Harley",
        "lastname": "Gibson",
        "jobprofile": "Lead Developer"
    },
    {
        "id": "4",
        "firstname": "Gary",
        "lastname": "Thompson",
        "jobprofile": "Lead Developer"
    },
    {
        "id": "5",
        "firstname": "Corey",
        "lastname": "Williamson",
        "jobprofile": "UI\/UX Developer"
    },
    {
        "id": "6",
        "firstname": "Samuel",
        "lastname": "Jones",
        "jobprofile": "Front-End Developer"
    },
    {
        "id": "7",
        "firstname": "Michael",
        "lastname": "Read",
        "jobprofile": "Backend Developer"
    },
    {
        "id": "8",
        "firstname": "Robert",
        "lastname": "Phillips",
        "jobprofile": "Android Developer"
    },
    {
        "id": "9",
        "firstname": "Albert",
        "lastname": "Stewart",
        "jobprofile": "Web Developer"
    },
    {
        "id": "10",
        "firstname": "Wayne",
        "lastname": "Diaz",
        "jobprofile": "Junior Developer"
    }
]
– Create a new Android Project JSONVolleyExample.
– Create an empty activity i.e MainActivity.
– Now we will add RecyclerView and Volley Library to our android project.
– Add the following dependency to your apps build.gradle file and Sync the project.
dependencies {

    compile 'com.android.support:recyclerview-v7:27.0.0'
    compile 'com.android.volley:volley:1.0.0'

}
– Also add INTERNET permission into your Manifest file.
<uses-permission android:name="android.permission.INTERNET" />
– Add RecyclerView to your MainActivity layout file i.e activity_main.xml
activity_main.xml file:
<?xml version="1.0" encoding="utf-8"?>
<RelativeLayout xmlns:android="http://schemas.android.com/apk/res/android"
      xmlns:app="http://schemas.android.com/apk/res-auto"
      xmlns:tools="http://schemas.android.com/tools"
      android:layout_width="match_parent"
      android:layout_height="match_parent"
      tools:context="com.sanktips.jsonvolleyexample.MainActivity">


<android.support.v7.widget.RecyclerView
      android:id="@+id/recycleViewContainer"
      android:layout_width="match_parent"
      android:layout_height="match_parent"
      android:layout_alignParentLeft="true"
      android:layout_alignParentStart="true"
      android:layout_alignParentTop="true" />


</RelativeLayout>
– Then create a custom layout file to format how a single row will look in our RecyclerView.
– Right click on the layout folder, New and then click on Layout resource file and name it to single_list_item.xml
single_list_item.xml file:
<?xml version="1.0" encoding="utf-8"?>
<RelativeLayout xmlns:android="http://schemas.android.com/apk/res/android"
android:layout_width="match_parent" android:layout_height="wrap_content">

<RelativeLayout
      android:id="@+id/singleRow"
      android:layout_width="match_parent"
      android:layout_height="wrap_content"
      android:padding="8dp">

<ImageView
      android:id="@+id/userImg"
      android:src="@drawable/icon_user"
      android:layout_width="60dp"
      android:layout_height="60dp" />

<TextView
      android:id="@+id/pNametxt"
      android:text="User Name"
      android:textSize="20sp"
      android:layout_marginTop="6dp"
      android:maxLines="1"
      android:layout_width="match_parent"
      android:layout_height="wrap_content"
      android:layout_alignParentTop="true"
      android:layout_toRightOf="@+id/userImg"
      android:layout_toEndOf="@+id/userImg"
      android:layout_marginLeft="8dp"
      android:layout_marginStart="8dp" />

<TextView
      android:id="@+id/pJobProfiletxt"
      android:text="Job Profile"
      android:textSize="14sp"
      android:maxLines="1"
      android:layout_width="match_parent"
      android:layout_height="wrap_content"
      android:layout_below="@+id/pNametxt"
      android:layout_alignLeft="@+id/pNametxt"
      android:layout_alignStart="@+id/pNametxt" />

</RelativeLayout>

<View
      android:layout_below="@+id/singleRow"
      android:layout_width="match_parent"
      android:layout_height="1dp"
      android:background="#f2f2f2" />

</RelativeLayout>
– Now create a simple model class to store the fetched data into objects.
PersonUtils.java file:
package com.sanktips.jsonvolleyexample;


public class PersonUtils {

    private String personFirstName;
    private String personLastName;
    private String jobProfile;

    public String getPersonFirstName() {
        return personFirstName;
    }

    public void setPersonFirstName(String personFirstName) {
        this.personFirstName = personFirstName;
    }

    public String getPersonLastName() {
        return personLastName;
    }

    public void setPersonLastName(String personLastName) {
        this.personLastName = personLastName;
    }

    public String getJobProfile() {
        return jobProfile;
    }

    public void setJobProfile(String jobProfile) {
        this.jobProfile = jobProfile;
    }

}
– Now we need an adapter to populate data into RecyclerView.
– Right click on package folder i.e in my case com.sanktips.jsonvolleyexample, New and then click on java class.
– Name the class as CustomRecyclerAdapter and extend it with RecyclerView.Adapter.
– Now create a constructor for the class and all overriding methods as given below.
CustomRecyclerAdapter.java file:
package com.sanktips.jsonvolleyexample;

import android.content.Context;
import android.support.v7.widget.RecyclerView;
import android.view.LayoutInflater;
import android.view.View;
import android.view.ViewGroup;
import android.widget.TextView;
import android.widget.Toast;

import java.util.List;


public class CustomRecyclerAdapter extends RecyclerView.Adapter<CustomRecyclerAdapter.ViewHolder> {

    private Context context;
    private List<PersonUtils> personUtils;

    public CustomRecyclerAdapter(Context context, List personUtils) {
        this.context = context;
        this.personUtils = personUtils;
    }

    @Override
    public ViewHolder onCreateViewHolder(ViewGroup parent, int viewType) {
        View v = LayoutInflater.from(parent.getContext()).inflate(R.layout.single_list_item, parent, false);
        ViewHolder viewHolder = new ViewHolder(v);
        return viewHolder;
    }

    @Override
    public void onBindViewHolder(ViewHolder holder, int position) {
        holder.itemView.setTag(personUtils.get(position));

        PersonUtils pu = personUtils.get(position);

        holder.pName.setText(pu.getPersonFirstName()+" "+pu.getPersonLastName());
        holder.pJobProfile.setText(pu.getJobProfile());

    }

    @Override
    public int getItemCount() {
        return personUtils.size();
    }

    public class ViewHolder extends RecyclerView.ViewHolder{

        public TextView pName;
        public TextView pJobProfile;

        public ViewHolder(View itemView) {
            super(itemView);

            pName = (TextView) itemView.findViewById(R.id.pNametxt);
            pJobProfile = (TextView) itemView.findViewById(R.id.pJobProfiletxt);

            itemView.setOnClickListener(new View.OnClickListener() {
                @Override
                public void onClick(View view) {

                    PersonUtils cpu = (PersonUtils) view.getTag();

                    Toast.makeText(view.getContext(), cpu.getPersonFirstName()+" "+cpu.getPersonLastName()+" is "+ cpu.getJobProfile(), Toast.LENGTH_SHORT).show();

                }
            });

        }
    }

}
– Then final step is to setup the RecyclerView with our Adapter and send a request to our server to get the data in response within our MainActivity.
– We have made a method name sendRequest(), in which we are sending a request to our server.
MainActivity.java file:
package com.sanktips.jsonvolleyexample;

import android.support.v7.app.AppCompatActivity;
import android.os.Bundle;
import android.support.v7.widget.LinearLayoutManager;
import android.support.v7.widget.RecyclerView;
import android.widget.TextView;

import com.android.volley.Request;
import com.android.volley.RequestQueue;
import com.android.volley.Response;
import com.android.volley.VolleyError;
import com.android.volley.toolbox.JsonArrayRequest;
import com.android.volley.toolbox.Volley;

import org.json.JSONArray;
import org.json.JSONException;
import org.json.JSONObject;

import java.util.ArrayList;
import java.util.List;

public class MainActivity extends AppCompatActivity {


    RecyclerView recyclerView;
    RecyclerView.Adapter mAdapter;
    RecyclerView.LayoutManager layoutManager;

    List<PersonUtils> personUtilsList;

    RequestQueue rq;

    String request_url = "http://localhost/testapi.php";

    @Override
    protected void onCreate(Bundle savedInstanceState) {
        super.onCreate(savedInstanceState);
        setContentView(R.layout.activity_main);


        rq = Volley.newRequestQueue(this);

        recyclerView = (RecyclerView) findViewById(R.id.recycleViewContainer);
        recyclerView.setHasFixedSize(true);

        layoutManager = new LinearLayoutManager(this);

        recyclerView.setLayoutManager(layoutManager);

        personUtilsList = new ArrayList<>();

        sendRequest();

    }


    public void sendRequest(){

        JsonArrayRequest jsonArrayRequest = new JsonArrayRequest(Request.Method.GET, request_url, null, new Response.Listener<JSONArray>() {
            @Override
            public void onResponse(JSONArray response) {

                for(int i = 0; i < response.length(); i++){

                    PersonUtils personUtils = new PersonUtils();

                    try {
                        JSONObject jsonObject = response.getJSONObject(i);

                        personUtils.setPersonFirstName(jsonObject.getString("firstname"));
                        personUtils.setPersonLastName(jsonObject.getString("lastname"));
                        personUtils.setJobProfile(jsonObject.getString("jobprofile"));

                    } catch (JSONException e) {
                        e.printStackTrace();
                    }

                    personUtilsList.add(personUtils);

                }

                mAdapter = new CustomRecyclerAdapter(MainActivity.this, personUtilsList);

                recyclerView.setAdapter(mAdapter);

            }
        }, new Response.ErrorListener() {
            @Override
            public void onErrorResponse(VolleyError error) {
		Log.i("Volley Error: ", error);
            }
        });

        rq.add(jsonArrayRequest);

    }

}
– Finally we are done with fetching JSON data using Volley and display it to RecyclerView in our Android Project.
Hope you find this article helpful. Join us on Facebook, Twitter and Google+ to get more updates on Android Development Tutorials.